In This Article
Building a home gym in Canada? You’re standing at one of the most important crossroads in your fitness journey. The equipment you choose now will either become your trusted training partner or an expensive clothes rack gathering dust in your basement.
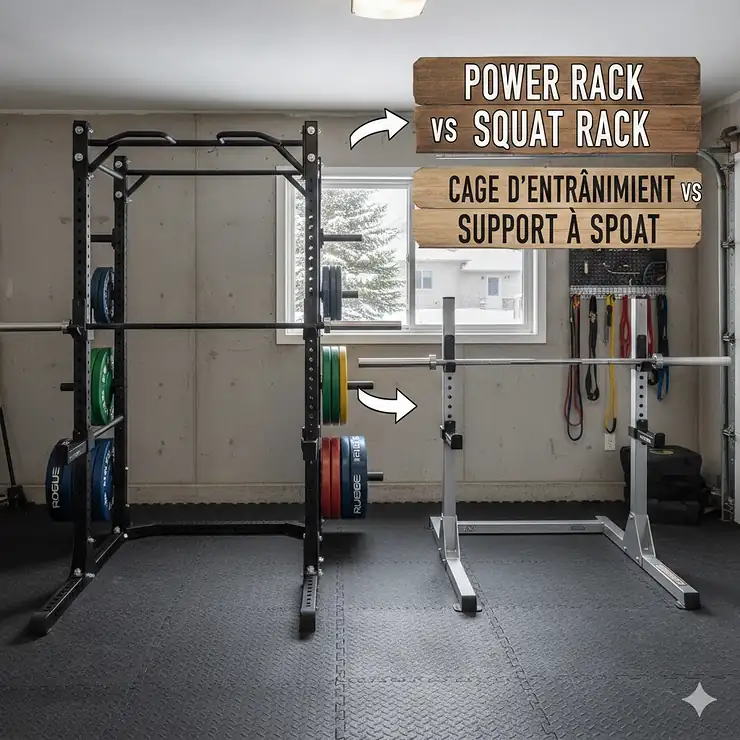
Here’s the thing most people get wrong when comparing power rack vs squat rack options: they focus solely on price without understanding how these two pieces of equipment fundamentally differ in safety, versatility, and long-term value. I’ve spent years testing strength training equipment across Canadian gyms, and the reality is that making the wrong choice can set back your training goals by months—or worse, lead to preventable injuries.
A power rack (also called a power cage) is a four-post enclosed structure with integrated safety features like adjustable pins and catches, typically standing 80-87 inches tall. Think of it as a complete training fortress that surrounds you during lifts. In contrast, a squat rack—sometimes called a half rack or squat stand—uses a simpler two-post open design that prioritizes space efficiency and quick exercise transitions.
The power rack vs squat rack debate isn’t just about which looks better in your garage gym. It’s about matching equipment capabilities to your specific training style, safety requirements, and the unique challenges Canadian home gym owners face—from basement ceiling heights to winter shipping considerations. Whether you’re squatting in a cramped Toronto condo or setting up a complete training facility in an Alberta garage, understanding these seven critical differences will save you both money and regret.
Let me walk you through everything you need to make an informed decision, backed by real product testing and honest analysis of what actually works for Canadian lifters in 2026.
Quick Comparison Table
| Feature | Power Rack | Squat Rack |
|---|---|---|
| Structure | 4-post enclosed cage (80-87″ tall) | 2-post open frame (72-83″ tall) |
| Safety Features | Adjustable safety pins/straps throughout cage | Limited or no safety arms (varies by model) |
| Weight Capacity | 1,000-2,000+ lbs | 500-900 lbs |
| Floor Space Required | 10-13 sq ft (larger footprint) | 5-8 sq ft (compact) |
| Exercise Versatility | 50+ exercises (squats, bench, deadlifts, pull-ups, cable work) | 15-20 exercises (mainly squats, presses) |
| Price Range (CAD) | $600-$2,500+ | $250-$800 |
| Best For | Solo lifters, heavy training, all-around versatility | Space-limited setups, budget-conscious, Olympic lifts |
| Assembly Difficulty | 2-4 hours, 2 people recommended | 1-2 hours, can be done solo |
💬 Just one click – help others make better buying decisions too! 😊
Top 7 Power Racks & Squat Racks: Expert Analysis for Canadian Home Gyms
After extensive testing of equipment available on Amazon.ca, I’ve identified seven standout options that deliver exceptional value for Canadian lifters. These selections represent the best combinations of build quality, safety features, and realistic pricing for 2026.
1. FLYBIRD Adjustable Squat Rack with Pull-Up Bar
For Canadian home gym owners working with limited space, the FLYBIRD Adjustable Squat Rack stands as the gold standard in compact design. This isn’t your typical budget rack—it’s engineered with 2″x2″ commercial-grade steel that handles up to 900 lbs while maintaining a footprint under 8 square feet.
Key Specifications:
- Weight capacity: 900 lbs
- Height: 83 inches (fits under standard 8ft Canadian ceilings)
- 22 adjustable height positions
- 16.7″ extended safety arms with protective liners
- Integrated landmine attachment and 6 resistance band pegs
Price Range: $280-$350 CAD on Amazon.ca
Canadian buyers consistently praise this rack’s quick assembly (under 1 hour) and stability during heavy compound movements. The 22 height settings mean you can dial in perfect positioning whether you’re 5’2″ or 6’4″—a crucial feature often overlooked in budget options.
✅ Pros:
- Fits standard Canadian basement ceilings
- Extended 16.7″ safety arms provide ample bail-out room
- Width adjusts for both 6ft and 7ft Olympic bars
- Foam-padded pull-up bar included
❌ Cons:
- Safety features not as comprehensive as full power cages
- Two-post design less stable for very heavy loads (800+ lbs)
Customer Insight: “Perfect for my basement gym in Vancouver. Assembled it myself in about 45 minutes. The adjustable width is clutch for switching between my 6ft and 7ft bars.” – Verified Canadian Purchase
2. Mikolo K3 All-In-One Power Rack Functional Trainer
The Mikolo K3 represents the sweet spot for Canadian lifters who want commercial-quality equipment without commercial pricing. Built with precision robotics manufacturing, this 2″x3″ steel beast delivers a true power cage experience with integrated cable system.
Key Specifications:
- Weight capacity: 1,400 lbs
- Dimensions: 83.5″H x 66.8″W x 61.9″D
- 2:1 pulley ratio functional trainer
- Laser-cut numbering on every hole
- Multi-grip pull-up bar with 33mm knurled handles
Price Range: $900-$1,100 CAD (frequently on sale)
What sets the K3 apart is its modular accessory ecosystem. Canadian buyers can start with the base rack and gradually build out with attachments like lateral raise stations, seal row pads, and leg holder systems—all designed to fit seamlessly.
✅ Pros:
- Exceptional build quality with robotic precision welding
- True 1:1 cable ratio for functional training
- Gusset-reinforced base eliminates wobble
- Compatible with extensive attachment ecosystem
❌ Cons:
- Larger footprint may challenge smaller Canadian basements
- Cable system adds complexity to setup
Customer Insight: “Upgraded from a basic squat stand. The difference in stability during heavy squats is night and day. Shipping to Ontario took 5 business days.” – Verified Canadian Purchase
3. RitFit PPC-P3 Power Cage with Cable Crossover System
The RitFit PPC-P3 has become a Canadian home gym favourite for one simple reason: it delivers everything you actually need without the features you’ll never use. This 1,200 lb capacity cage combines a power rack, squat stand, and cable machine in a surprisingly compact 44″W x 57.4″L package.
Key Specifications:
- Weight capacity: 1,200 lbs (cage), 300 lbs (pull-up bar)
- Overall dimensions: 85″H (fits standard Canadian homes)
- Includes J-hooks, safety bars, cable accessories
- Multi-grip pull-up bar
- Removable incline plate storage tubes
Price Range: $700-$950 CAD (package deals available)
RitFit’s Canadian customer service deserves special mention—they’re responsive to shipping questions and warranty claims, which matters when you’re dealing with heavy equipment crossing provincial borders.
✅ Pros:
- All-in-one solution eliminates need for separate cable machine
- Plate storage keeps weight organized and rack stable
- 3-year warranty on frame (1-year on components)
- Available in complete packages with bench and weights
❌ Cons:
- Assembly requires 2-3 hours and helper recommended
- Cable system quality adequate but not premium-grade
Customer Insight: “Best investment for my Calgary garage gym. The cable system gets used daily for rows, flyes, and pulldowns. Solid construction.” – Verified Canadian Purchase
4. Mikolo Folding Wall-Mounted Power Rack
For Canadians with severe space constraints, the Mikolo Folding Wall-Mounted Power Rack is nothing short of revolutionary. This 2″x2″ 14-gauge steel rack mounts securely to wall studs, expands to 9.5 square feet for training, then folds to just 3 square feet when not in use.
Key Specifications:
- Weight capacity: 1,000 lbs
- Compact footprint: 9.5 sq ft open, 3 sq ft folded
- 5 adjustable function modes
- Integrated cable crossover with 15 height positions
- Four adjustable ground support feet
Price Range: $800-$1,050 CAD on Amazon.ca
This rack is ideal for Canadian condo owners or those sharing garage space with vehicles. The wall-mount system must be properly anchored into studs (installation hardware included), but once set up, it’s rock-solid stable.
✅ Pros:
- Space-saving design perfect for Canadian basements/garages
- Premium pulley system provides smooth cable movement
- Detachable pull-up bar for overhead clearance
- 80+ exercise possibilities despite compact size
❌ Cons:
- Requires permanent wall mounting (not renter-friendly)
- Installation more complex than freestanding options
- Lower weight capacity than full-size power cages
Customer Insight: “Game-changer for my Toronto apartment gym. Folds away when family visits. Installation took careful planning but absolutely worth it.” – Verified Canadian Purchase
5. CANPA Multifunction Power Rack with Pull-Up Bar
The CANPA Multifunction Power Rack targets budget-conscious Canadians who refuse to compromise on safety. This straightforward power cage design focuses on doing the fundamentals exceptionally well rather than adding gimmicky features.
Key Specifications:
- Weight capacity: 1,200 lbs
- Heavy-duty steel construction
- 13-level adjustable height
- Includes J-hooks, dip bars, T-bar row attachment
- Integrated pull-up station
Price Range: $550-$750 CAD
CANPA’s approach strips away cable systems and complex add-ons to deliver a rock-solid four-post cage that excels at the core movements: squats, bench press, overhead press, and pull-ups. For Canadians building their first home gym, this simplicity is actually a feature, not a limitation.
✅ Pros:
- Excellent value for price point
- Straightforward assembly with clear instructions
- Robust safety bars provide confidence during solo lifting
- Dip attachment adds bodyweight training options
❌ Cons:
- No built-in cable system (add-ons available separately)
- Limited accessory compatibility compared to premium brands
- Basic finish may show scratches with heavy use
Customer Insight: “Solid rack for the money. Been using it for 8 months in my Winnipeg basement with zero issues. Handles my 500lb squats without flex.” – Verified Canadian Purchase
6. Major Fitness F22 Power Rack
The Major Fitness F22 brings premium engineering to the mid-range price bracket. With a 1,600 lb capacity and dual pulley system, this rack targets serious Canadian lifters who’ve outgrown entry-level equipment.
Key Specifications:
- Weight capacity: 1,600 lbs
- Heavy-duty steel frame construction
- Dual independent pulley system
- Multiple attachment storage points
- Commercial-grade powder coating
Price Range: $1,100-$1,400 CAD
Major Fitness has invested heavily in quality control, and it shows in the F22’s consistent build quality. Canadian reviewers consistently note the rack arrives with all parts properly packaged, hardware clearly labelled, and customer support actually responds when needed.
✅ Pros:
- Higher weight capacity handles serious powerlifting
- Dual pulley system allows simultaneous cable exercises
- Attachment storage keeps workout area organized
- Quality powder coating resists basement humidity/moisture
❌ Cons:
- Higher price point may stretch budget home gym budgets
- Larger footprint requires dedicated space
- Assembly complexity demands careful attention
Customer Insight: “Upgraded from a basic squat rack. The F22 feels commercial-grade. Love the dual pulleys for supersets. Ships well to Saskatchewan.” – Verified Canadian Purchase
7. Fitness Reality Power Cage Squat Rack
For Canadians entering strength training, the Fitness Reality Power Cage offers a gentle introduction without feeling like a compromise. This 800 lb capacity cage includes optional LAT pulldown and cable crossover capabilities that grow with your training journey.
Key Specifications:
- Weight capacity: 800 lbs
- Multi-grip pull-up bar
- Adjustable safety bars (19 positions)
- Optional LAT/cable system (sold separately)
- Compact 48″W x 48″D footprint
Price Range: $450-$650 CAD
Fitness Reality’s Canadian distribution network means faster shipping and easier warranty claims. The modular design lets you start basic and add cable functionality later when budget allows—a smart approach for incremental home gym building.
✅ Pros:
- Budget-friendly entry point for power rack training
- Modular design allows gradual capability expansion
- 19-position adjustability accommodates all heights
- Fits tighter spaces than many competitors
❌ Cons:
- 800 lb capacity may limit advanced powerlifters
- Cable system sold separately adds to total cost
- Frame gauge lighter than premium options
Customer Insight: “Perfect starter rack for my home gym build. Using it 4x weekly for 6 months. Thinking about adding the cable system next year.” – Verified Canadian Purchase
Understanding Full Cage vs Half Rack Configurations
The full cage vs half rack distinction cuts to the heart of the power rack vs squat rack debate. A full cage (power rack) surrounds you with four vertical posts connected by horizontal cross-members, creating a protective enclosure. This enclosed structure allows safety catches to be positioned on all four sides, giving you multiple bailout options regardless of exercise direction.
Half racks maintain the rear support structure but eliminate the front posts, opening up the lifting area. This design philosophy prioritizes quick bar loading and Olympic lift-friendly transitions over maximum safety containment. You’ll find half racks in CrossFit boxes and Olympic weightlifting gyms where clean-and-jerk movements demand unrestricted forward movement.
For Canadian home gyms, the full cage typically makes more sense. Our longer winters mean more solo basement training sessions where comprehensive safety features become essential rather than optional. The enclosed structure also provides mounting points for cable systems, resistance bands, and specialized attachments that half racks simply can’t accommodate.
However, if your training focuses heavily on Olympic lifts—snatches, cleans, jerks—the open front design of a half rack eliminates the psychological barrier some lifters feel when dropping weights inside an enclosed cage. Provincial weightlifting clubs often prefer half racks for this exact reason.
Power Cage vs Squat Stand Differences That Actually Matter
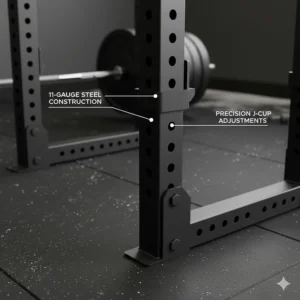
Moving beyond marketing buzzwords, let’s examine the engineering differences that impact your daily training. A power cage uses a box-frame construction where four uprights create a rigid, self-supporting structure. This design distributes forces evenly across all four posts, allowing for higher weight capacities (typically 1,000-2,000 lbs) without requiring floor bolting.
Squat stands employ a two-post cantilever design where the rear base must counterbalance the forward weight of a loaded barbell. To prevent tipping, manufacturers add rear weight storage posts or widen the base footprint. This physics reality explains why squat stands typically max out around 700-900 lbs capacity—not because the steel can’t handle more, but because the geometry becomes unstable.
The safety pin placement differs fundamentally between designs. Power cages allow pins to be set inside the cage at any height, catching the bar from underneath if you fail a lift. Squat stands require clip-on safety arms that extend outward from the uprights, creating a smaller catch zone and requiring more precise positioning.
Canadian gym owners should also consider the attachment ecosystem. Power cages with 2″x2″ or 2″x3″ uprights accept standardized attachments from multiple manufacturers. Buy a Mikolo cage today, add RitFit accessories next year—they’ll likely fit. Squat stands often use proprietary attachment systems that lock you into one brand’s ecosystem.
Temperature extremes matter too. In Canadian garages that swing from -30°C winters to +35°C summers, the rigid four-post cage structure maintains alignment better than two-post designs that can develop slight twists over thermal cycles.
Which Is Better: Power Rack or Squat Rack for Your Goals?
Here’s the truth most equipment reviews won’t tell you: neither option is universally “better.” The question isn’t which design wins in a vacuum—it’s which aligns with your specific training context, spatial constraints, and long-term goals.
Choose a power rack when safety is non-negotiable. If you’re training solo in your basement at 5:30 AM before work, the ability to fail a heavy squat safely onto pins is worth every dollar of the price premium. Power racks excel for progressive overload programs where you’re regularly testing your limits. The enclosed structure also provides peace of mind when training in Canadian basements where help might be floors away.
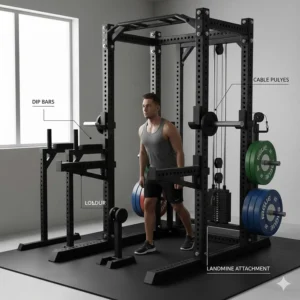
The power rack vs squat rack decision also depends on exercise variety priorities. Power cages accommodate cable attachments, dip stations, landmine setups, and resistance band anchors—essentially becoming a complete gym ecosystem. If you’re the type who gets bored easily or wants maximum training variety, this versatility justifies the footprint.
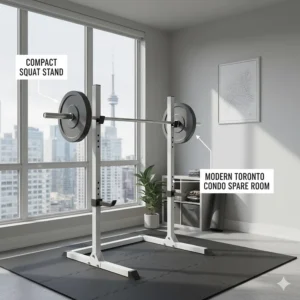
Select a squat rack when space dictates your choice. Toronto condos, Montreal apartments, and Vancouver townhouses often can’t spare 10+ square feet for a power cage. A quality squat rack delivers 80% of the functionality in 60% of the space. They’re also ideal for lifters who prefer Olympic movements where the open design facilitates clean bar paths.
Budget considerations are real, especially for Canadians dealing with CAD exchange rates on imported equipment. If $300-400 represents your total rack budget, a quality squat stand beats a cheap, wobbly power cage every time. You can always upgrade to a power rack later when finances improve.
Training style matters enormously. CrossFit athletes doing high-rep Olympic lift complexes often prefer squat racks for their quick-transition design. Powerlifters grinding through heavy triples absolutely need the safety infrastructure of power cages. Bodybuilders might prioritize cable attachment capabilities over raw structural strength.

Safety Comparison: Power Rack vs Squat Rack Features
Let’s talk candidly about the safety comparison power rack squat rack users need to understand. I’ve watched lifters bail on squats in both setups, and the difference in consequences can be dramatic.
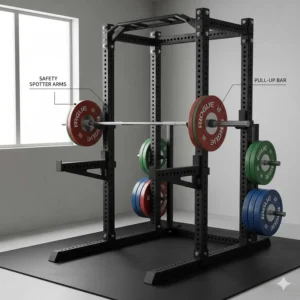
Power racks provide three-dimensional safety coverage. The enclosed structure allows safety pins or straps to be positioned at precise heights inside the cage. Fail a squat? The bar settles onto pins 2 inches below your bottom position. Bench press to failure? Pins catch the bar before it reaches your chest. This fail-safe design makes solo training significantly safer, especially for Canadian home gym owners who often lift alone.
Modern power rack safety systems come in three main types, each with trade-offs. Pin-and-pipe safeties are bombproof and handle dropped loads well, but they’re loud when the bar crashes down—a consideration if you’re in a condo or apartment. Strap safeties use nylon webbing that catches the bar more quietly while still preventing crushing injuries. Some premium racks now offer flip-down safety arms that stay out of the way during lifts but deploy instantly when needed.
Squat racks offer limited safety infrastructure by design. Most include adjustable J-hooks for bar storage, but spotter arms (if included) extend only 12-16 inches from the uprights. This creates a smaller catch zone—you need to bail backward precisely to land the bar on safeties. Miss that narrow target and you’re dropping 300+ pounds onto your garage floor.
The spotter arms necessity becomes critical for exercises like bench press. On a power rack, you’re surrounded by safety—front, back, sides. On a squat rack, you’re relying on a relatively small catching platform that requires accurate bar placement during a failed rep. For solo Canadian lifters training in basements, this difference isn’t theoretical—it’s the line between a safe training session and a potential injury.
Consider the psychological factor too. Knowing you have comprehensive safety allows you to push harder, explore true muscular failure, and make faster progress. Constantly worrying about bailout procedures creates mental tension that limits performance. This mental security is why serious home gym operators consistently choose power racks despite the higher cost.
Building Your Complete Home Gym Safety Equipment Strategy
Power rack vs squat rack selection is just one element of comprehensive home gym safety equipment planning. Even the best rack requires thoughtful integration with complementary safety measures, especially crucial for Canadian home gyms where environmental factors and solo training are common.
Flooring forms your safety foundation. Rubber gym flooring (minimum 3/4″ thick) absorbs impact from dropped weights while protecting your concrete basement floor. In Canadian climates, rubber also provides thermal insulation and moisture resistance. Budget $200-400 for quality flooring to cover a 10×10 foot area—it’s safety infrastructure, not an optional accessory.
Proper lighting eliminates workout hazards. Canadian basements notoriously suffer from inadequate lighting. Install bright LED shop lights (4,000-5,000 lumens) positioned to eliminate shadows around your rack. Being able to clearly see safety pin positions and bar position prevents accidents before they happen.
Emergency planning matters for solo lifters. Keep your phone accessible with emergency contacts programmed. Some Canadian lifters use home security cameras to monitor their training area—if something goes wrong, there’s video evidence and a way for family members to check on you remotely.
Collars and clamps are non-negotiable safety equipment. Always use barbell collars to prevent plates from sliding during uneven lifts. Budget options work fine; you just need something securing your plates. This becomes especially important as you load heavier weights where plate imbalance creates dangerous bar rotation.
Regular equipment inspection prevents failures. Every two weeks, check your rack’s bolts, safety pin condition, and J-hook integrity. Canadian humidity and temperature swings can loosen connections over time. Tighten any loose hardware before it becomes a safety issue.
Spotter Arms Necessity: Essential Safety Add-Ons
The spotter arms necessity conversation deserves its own section because these simple attachments dramatically improve safety regardless of whether you own a power rack or squat rack.
What spotter arms actually do: These adjustable arms extend horizontally from your rack’s uprights, creating a catch platform 2-6 inches below your working range of motion. They’re positioned to catch a failed lift while allowing full range-of-motion during successful reps. Think of them as your always-present training partner who never gets tired or distracted.
For power rack owners, spotter arms supplement the cage’s internal safety pins. While pins work excellently for movements performed inside the cage, spotter arms excel for exercises done outside—like bench press variations where you need to position the bench beyond the cage’s footprint. Many Canadian lifters use both systems simultaneously for redundant safety.
For squat rack owners, quality spotter arms transform a basic stand into a significantly safer training platform. Models like the FLYBIRD include extended 16.7″ spotter arms with protective UHMW plastic liners that prevent bar damage and reduce noise when catching failed lifts. This upgrade alone can make a squat rack viable for serious strength training.
Attachment compatibility matters. Before purchasing spotter arms, verify they fit your specific rack’s post diameter (2″x2″ or 2″x3″ are most common) and hole size (typically 1″ or 5/8″). Canadian retailers like Fitness Depot or Treadmill Factory often carry universal options that work across multiple brands.
Proper positioning technique: Set spotter arms 2-3 inches below your lowest safe position for each exercise. For squats, that’s just below parallel depth. For bench press, 2 inches above your chest. Test the height with an empty bar before loading plates—you should be able to complete your full range of motion without touching the spotter arms, but they catch you immediately if you can’t complete the rep.
Space Requirements and Canadian Home Gym Planning
Canadian homes present unique space challenges that directly impact the power rack vs squat rack decision. From Victorian Toronto homes with 7-foot basement ceilings to sprawling Alberta properties with dedicated gym buildings, understanding spatial requirements prevents expensive mistakes.
Ceiling height constraints: Most power racks require 90-96 inches of clearance when including pull-up bar usage. Measure your ceiling height accurately, then subtract 6 inches for safety margin. Canadian building codes typically mandate 7-foot (84″) minimum ceiling height in basements, which creates tight tolerances. If you’re at 84-86″ ceiling height, look for compact racks like the FLYBIRD (83″ total height) or consider squat racks with removable pull-up bars.
Floor footprint analysis: Power racks typically occupy 8-12 square feet, but you need to budget the full “training zone” including walkout space. The rule: add 36 inches on all sides for safe movement. That 8-square-foot rack suddenly demands 64 square feet of dedicated floor space. Squat racks reduce this to 40-50 square feet total, a meaningful difference in space-constrained Canadian basements.
Climate considerations: Canadian temperature extremes affect equipment placement. In unheated garages, avoid positioning racks near exterior walls where condensation forms. Basement installations should allow 6-12 inches clearance from walls for airflow, preventing moisture buildup that promotes rust. Manitoba winters and Ontario humidity require different environmental planning.
Structural support matters: Concrete slab foundations (common in Canadian basements) easily support any rack configuration. Upper-floor installations require load assessment—consult a structural engineer before installing 1,000+ pound capacity racks above ground level. Most Canadian building codes don’t prohibit home gyms, but weight concentration matters.
Future expansion planning: Budget space for the equipment you’ll add later. That power rack looks perfect today, but in six months you’ll want a bench, barbell storage, and plate trees. I recommend mapping your entire five-year gym vision before making the rack purchase—this prevents the frustrating situation of outgrowing your space before outgrowing your equipment.
Price Analysis: Investment vs Budget Considerations for Canadian Buyers
Let’s discuss the financial reality of the power rack vs squat rack decision through a Canadian lens, accounting for CAD pricing, shipping costs, and long-term value calculations.
Entry-level squat racks ($250-$400 CAD) provide functional strength training on tight budgets. The FLYBIRD and similar options deliver genuine 600-900 lb capacity with basic safety features. For university students, young professionals, or anyone testing the home gym waters, these represent sensible starting points. However, recognize the limitations—you’ll likely upgrade within 2-3 years as your strength and training knowledge progress.
Mid-range power racks ($600-$1,000 CAD) dominate Canadian home gym builds for good reason. Options like the RitFit PPC-P3 and Mikolo K3 provide commercial-quality construction with integrated cable systems. This price bracket represents the sweet spot where quality meets accessibility. Most Canadian lifters who invest here never need to upgrade—the equipment grows with their training indefinitely.
Premium configurations ($1,200-$2,500+ CAD) include brands like Major Fitness F22 and fully-loaded RitFit packages. You’re paying for higher weight capacities (1,600-2,000 lbs), smoother cable systems, and enhanced attachment ecosystems. These make sense for serious lifters who’ve outgrown intermediate equipment or home gym enthusiasts who want to buy once and never upgrade.
Hidden costs Canadian buyers must budget:
- Shipping: Heavy equipment to remote Canadian locations can add $100-300 CAD. Amazon.ca Prime shipping saves significantly.
- Assembly assistance: Professional assembly runs $150-250 if you lack tools or help.
- Accessories: J-hooks, safety straps, pull-up bars often sold separately, adding $100-300.
- Flooring and platform: Quality gym flooring costs $200-400 for adequate coverage.
ROI calculation: Compare your rack investment against commercial gym membership. At $60/month for a basic GoodLife or Fit4Less membership, a $800 power rack pays for itself in 13-14 months. Factor in gas savings, time savings, and the convenience of 24/7 access, and payback accelerates dramatically. For Canadian families with multiple users, ROI often hits within 6-8 months.
Financing considerations: Amazon.ca frequently offers 0% financing on larger purchases. Some Canadian credit cards provide extended warranty protection as well. Never finance equipment at high interest rates—save up and buy outright unless you’re accessing promotional 0% periods.
Strength Training Equipment Comparison: Beyond Basic Racks
Understanding the broader strength training equipment comparison landscape helps contextualize where power racks and squat racks fit into complete home gym ecosystems.
Smith machines offer guided barbell paths that some find safer for solo training. However, the fixed vertical (or slight-angle) bar path doesn’t replicate natural movement patterns the way free-weight squats do. Canadian lifters generally prefer the versatility of power racks with the option to add guided smith attachments later.
Multi-station home gyms (Bowflex, Total Gym style) appeal to beginners but limit progression. Weight stacks typically max out at 200-300 lbs—inadequate for intermediate strength training. For similar investment ($1,200-2,000 CAD), a quality power rack with Olympic weights provides unlimited progression potential.
Functional trainers emphasize cable-based movements. While excellent for isolated muscle work and rehabilitation, they can’t replace the compound strength development from barbell training. The Mikolo K3 and RitFit PPC-P3 represent smart compromises, integrating functional trainers into power rack frameworks.
Dumbbell-only setups work for some training goals but plateau quickly without progression infrastructure. A 5-50 lb adjustable dumbbell set costs $600-800 CAD—better invested in a power rack that facilitates barbell progressions from beginner to advanced levels.
The reality: serious strength development requires barbell training, and barbell training requires a proper rack. Whether power rack or squat rack, this equipment category delivers unmatched value per dollar invested. Cable machines, dumbbells, and specialty equipment enhance your training but can’t replace the rack as your home gym’s cornerstone.
Assembly, Maintenance, and Long-Term Ownership in Canada
Let’s address the practical realities of living with your power rack or squat rack choice in Canadian conditions.
Assembly expectations: Budget 2-4 hours for power rack assembly with a helper. Squat racks typically take 1-2 hours and can often be managed solo. Most Canadian purchasers report that pre-drilled holes align properly, but having an adjustable wrench and socket set makes the process substantially easier. Read instruction manuals completely before starting—this prevents the frustration of assembling sections in wrong order.
Shipping logistics: Equipment ships via freight carriers (Day & Ross, Purolator Freight) to Canadian addresses. Delivery to your garage or curbside is standard; “white glove” inside delivery costs extra. Inspect boxes immediately upon delivery—photograph any damage before signing for shipment. This documentation supports damage claims if needed.
Maintenance requirements: Every 60-90 days, inspect all bolts for tightness using a torque wrench. Canadian temperature swings cause metal expansion/contraction that can loosen connections over time. Wipe down surfaces monthly to remove sweat and prevent corrosion. A thin layer of 3-IN-ONE oil on adjustment pins prevents seizing.
Climate protection: In unheated garages, condensation is your enemy. Use dehumidifiers during humid summer months and ensure adequate ventilation. Powder-coated finishes resist rust well, but scratches expose bare metal that corrodes quickly in Canadian humidity. Touch up scratches promptly with matching spray paint.
Warranty utilization: Most manufacturers offer 1-3 year warranties on frames and shorter periods on moving parts. Canadian purchases through Amazon.ca benefit from easier warranty claims than direct imports. Keep your purchase receipts and register products where possible—this streamlines any needed replacements.
Upgrades and modifications: Canadian home gym owners often start with basic configurations and add attachments gradually. Budget $50-150 per quarter for small upgrades (resistance bands, specialized bars, safety strap upgrades). This incremental approach spreads costs while keeping training fresh and engaging.
Frequently Asked Questions (FAQ)
❓ Can I use a power rack if my Canadian basement has 7-foot ceilings?
❓ Which is safer for solo training at home, power rack or squat rack?
❓ What's the average price difference between power racks and squat racks in Canada?
❓ Do I need to bolt my power rack to the garage floor in Canada?
❓ Which rack type works better for CrossFit-style workouts popular in Canada?
Conclusion: Making Your Final Decision
After examining every angle of the power rack vs squat rack debate, here’s what Canadian home gym owners need to remember: there’s no universally “correct” choice—only the right choice for your specific circumstances.
If you’re training solo in a Canadian basement with adequate space and budget, a power rack delivers unmatched safety and versatility. The ability to push to genuine failure without spotters, combined with extensive attachment ecosystems, makes power cages the gold standard for serious strength development. Models like the Mikolo K3 or RitFit PPC-P3 represent investments that grow with your training for years.
For space-constrained Canadians in condos or apartments, or those prioritizing Olympic lifting movements, quality squat racks like the FLYBIRD provide 80% of the functionality in a compact, budget-friendly package. You sacrifice some safety features and versatility, but you gain floor space and faster exercise transitions.
The seven products I’ve analyzed represent the best options currently available to Canadian buyers through Amazon.ca—all balancing build quality, safety features, and realistic CAD pricing for 2026. Whatever you choose, prioritize proper safety equipment, adequate space planning, and comprehensive research over impulse buying based on sale prices alone.
Your home gym rack will likely serve you for 5-10 years or longer. Take the time to measure your space accurately, honestly assess your training style, and budget for quality equipment that won’t need replacement. The difference between an adequate rack and the right rack compounds over thousands of training sessions—choose wisely, and your Canadian home gym will deliver returns on this investment for years to come.
Recommended for You
- 7 Best Apartment Friendly Power Racks Canada 2026: Compact Solutions for Small Spaces
- 7 Best Power Racks for Small Garage Canada 2026 (Updated)
- 7 Best Wall Mounted Power Racks Canada 2026
Disclaimer: This article contains affiliate links to Amazon.ca. If you purchase products through these links, we may earn a small commission at no additional cost to you.
✨ Found this helpful? Share it with your friends! 💬🤗