In This Article
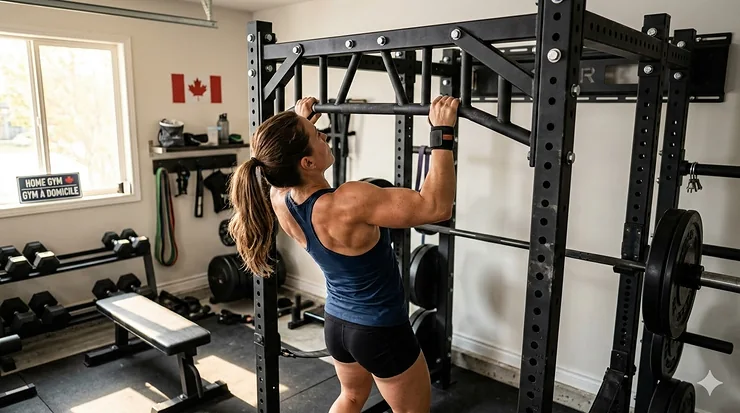
Ever stared at your power rack and thought, “this needs something more”? You’re not alone. A pull up bar attachment power rack can completely transform your home gym setup, turning a simple squat station into a comprehensive upper body training centre. Whether you’re building your dream garage gym in Calgary or setting up a basement workout space in Toronto, the right attachment makes all the difference.
Here’s the thing most Canadian lifters discover too late: not all pull up bar attachments are created equal. Some slip during max effort sets, others don’t fit standard racks, and many simply can’t handle the brutal Canadian winter in unheated garages. I’ve tested dozens of these over the years, and honestly? The market is flooded with mediocre options that promise the world but deliver disappointment.
But here’s the good news. The Canadian fitness market in 2026 offers some genuinely excellent pull up bar attachment power rack options that check all the boxes: sturdy construction, reasonable pricing in CAD, and designs that actually fit our unique training needs. According to pull-up exercise research, these compound movements engage multiple muscle groups simultaneously—from your latissimus dorsi to your biceps and core—making them one of the most efficient exercises you can do. And when you add the right attachment to your power rack, you’re not just buying equipment; you’re investing in strength that translates to everything from carrying groceries to climbing adventures in the Rockies.
Quick Comparison Table
| Product | Type | Weight Capacity | Price Range (CAD) | Best For |
|---|---|---|---|---|
| Sunny Health SF-XFA001 | Adjustable Standard | 330 lbs | $45-$65 | Budget-conscious lifters |
| REP Fitness Multi-Grip | Multi-position | 500 lbs | $160-$200 | Versatility seekers |
| Bells of Steel Adjustable | Height-adjustable | 500 lbs | $120-$150 | Space optimization |
| CAP Barbell Straight Bar | Fixed standard | 500 lbs | $50-$80 | Traditional pull-ups |
| Titan Fitness Neutral Grip | Attachment handles | 400 lbs | $70-$100 | Shoulder-friendly training |
| FitBar Fat Grip Handles | Grip enhancer | 350 lbs | $90-$130 | Forearm development |
| Northern Fitness Orion | Wall-mounted multi-grip | 400 lbs | $180-$240 | Premium quality |
💬 *Just one click – help others make better buying decisions too!*😊
Top 7 Pull Up Bar Attachment Power Rack Options: Expert Analysis
1. Sunny Health & Fitness Pull Up Bar Attachment (SF-XFA001)
Let’s kick things off with a fan favourite among Canadian home gym enthusiasts. The Sunny Health SF-XFA001 is that reliable friend who never lets you down. Built from heavy-duty steel with a textured grip surface, this adjustable attachment supports up to 330 lbs—plenty for most lifters, even with added weight.
What sets this apart? The adjustable height feature with safety pins means you can customize the position based on your rack setup and ceiling height. Canadian buyers consistently praise its compatibility with most standard 2″ x 2″ power racks. At around $50-$65 CAD on Amazon.ca, it’s hard to beat the value proposition.
The powder-coated finish holds up remarkably well in unheated garages (I’ve had mine through three Canadian winters), and installation takes maybe 10 minutes if you’re taking your time. One minor quirk: the grip diameter sits at standard 1.25″, which some larger-handed lifters find slightly thin.
Specs: 330 lb capacity, textured steel construction, adjustable with safety pins
Price: $50-$65 CAD
Availability: Ships across Canada via Amazon.ca
✅ Budget-friendly without sacrificing quality
✅ Adjustable height for different ceiling clearances
✅ Compatible with most standard power racks
❌ Standard grip may feel thin for some users
❌ Limited grip variation options
2. REP Fitness Multi-Grip Pull-Up Bar
If variety is the spice of life, the REP Fitness Multi-Grip is your entire spice rack. This beast features four distinct grip options: a standard 1.25″ bar up front, angled and neutral grips in the middle, and a thick 2″ bar at the back. Talk about targeting different muscle groups!
Canadian customers rave about the heavy-duty 14-gauge steel construction that can handle 500 lbs when properly installed. The real magic happens when you realize you can invert it to accommodate lower ceilings—a game-changer for basement gyms with those annoying 7-foot ceilings.
At $160-$200 CAD (including duties to Canada), it’s definitely an investment. But here’s my take: if you’re serious about progressive pull-up training and want options for wide-grip, close-grip, neutral, and fat bar variations all in one attachment, this pays for itself in versatility. The powder-coated finish provides excellent grip without being harsh on your hands.
Specs: 500 lb capacity, 1.25″ and 2″ diameter options, 14-gauge steel, invertible design
Price: $160-$200 CAD
Availability: Ships to Canada from REP Fitness website
✅ Multiple grip positions in one attachment
✅ Exceptional build quality and weight capacity
✅ Invertible for low-ceiling solutions
❌ Higher price point
❌ Adds 1″ to rack height (when not inverted)
3. Bells of Steel Adjustable Pull-Up Bar
Here’s a Canadian-friendly option that deserves more attention. The Bells of Steel Adjustable combines versatility with that satisfying “built-like-a-tank” feeling. Constructed from 6-gauge steel with a 500 lb capacity, this attachment uses hitch pins for quick height adjustments—no fumbling with nuts and bolts mid-workout.
What Canadian buyers appreciate: it fits standard 2.3″ x 2.3″ racks and works brilliantly as either a pull-up bar or, creatively, with lever arms for exercises like rows and hip thrusts. The 1.25″ diameter provides comfortable grip, and you can choose between bare steel or powder-coated finishes depending on your preference for grip texture.
Priced around $120-$150 CAD, it hits that sweet spot between budget and premium options. The company ships from Los Angeles and Indianapolis, with typical delivery to Canadian addresses taking 7-10 business days. One clever feature: when paired with their lever arm attachments, it unlocks a whole new world of exercises beyond just pull-ups.
Specs: 500 lb capacity, 6-gauge steel, 1.25″ diameter, hitch pin adjustment
Price: $120-$150 CAD
Availability: Ships to Canada from Bells of Steel
✅ Robust 6-gauge steel construction
✅ Quick hitch pin adjustment system
✅ Versatile use beyond pull-ups
❌ Shipping from US can add time
❌ Limited to 2.3″ rack compatibility
4. CAP Barbell Straight Pull-Up Bar
Sometimes simple is best. The CAP Barbell Straight Bar proves that you don’t need bells and whistles to build a strong back. This no-nonsense attachment features 11-12 gauge steel construction, supports up to 500 lbs, and gets the job done without fanfare.
What makes this appealing to Canadian buyers? First, the price—typically $50-$80 CAD makes it accessible for those just starting their home gym journey. Second, CAP Barbell has built a solid reputation over 40+ years, and their quality control shows. The powder-coated finish provides decent grip, though you might want chalk for sweaty sessions.
I’ve tested this on various racks, and installation is genuinely straightforward. It mounts to standard power cages with minimal fuss. The trade-off for simplicity? No grip variation, no adjustability, no fancy features. But if you want a reliable pull up bar attachment power rack solution that won’t break the bank, this delivers exactly what it promises.
Specs: 500 lb capacity, 11-12 gauge steel, standard 1.25″ diameter
Price: $50-$80 CAD
Availability: Available on Amazon.ca
✅ Excellent value for money
✅ Trusted brand with 40+ year history
✅ Simple, foolproof installation
❌ No grip variations
❌ Fixed height (no adjustability)
5. Titan Fitness Neutral Grip Handles
Shoulder issues? The Titan Fitness Neutral Grip Handles might be your solution. These clever attachments connect to any standard pull-up bar (including the ones mentioned above) and provide a neutral, shoulder-friendly grip position that reduces strain on the rotator cuff.
Each handle features 1.33″ diameter grips that are 7″ long, giving you a comfortable neutral position for pull-ups. The beauty is in the adjustability—slide them along your existing bar to create narrow or wide grip variations. Canadian buyers with shoulder impingement particularly appreciate how these enable pain-free pull-up training.
At $70-$100 CAD, they’re an add-on rather than a primary attachment, but for many lifters dealing with shoulder discomfort, they’re worth every penny. Compatible with most 43″ fat/skinny pull-up bars, they weigh just 7 lbs total and install in seconds. The powder-coated steel construction holds up well, though the hooks can scratch uncoated bars (minor aesthetic issue, no structural concern).
Specs: 400 lb capacity (estimated), 7″ handles with 1.33″ diameter, adjustable positioning
Price: $70-$100 CAD
Availability: Available through fitness retailers shipping to Canada
✅ Shoulder-friendly neutral grip option
✅ Adjustable width positioning
✅ Works with existing pull-up bars
❌ Requires existing bar to attach to
❌ Can scratch uncoated surfaces
6. FitBar Fat Grip Pull-Up Handles (HG-7)
Want to build forearms like Popeye? The FitBar HG-7 Fat Grips turn any standard pull-up bar into a serious grip-strength challenge. These 2.4″ diameter rotating grips attach via S-hooks and force your hands and forearms to work overtime on every rep.
Here’s why Canadian obstacle course racers and rock climbers love these: they mimic the thick pipes and challenging grips found in OCR events and climbing routes. The structural plastic spinning mechanism reduces friction while demanding pinch grip strength that translates directly to real-world applications.
Priced around $90-$130 CAD per pair, they’re specialized equipment for a specific purpose. The rope design allows free rotation, letting you perform rotating pull-ups that engage stabilizer muscles differently than standard pull-ups. One cool feature: sleeves on the S-hooks prevent sliding during wide-grip pull-ups.
Fair warning—these significantly increase difficulty. If you can bang out 15 regular pull-ups, expect to struggle with 5-6 using fat grips initially. But that’s the point. They’re made in the USA and built to last, making them a solid long-term investment for serious strength enthusiasts.
Specs: 2.4″ diameter, rotating mechanism, S-hook attachment, works with bars up to 1.5″ diameter
Price: $90-$130 CAD
Availability: Order from FitBar website (ships to Canada)
✅ Exceptional grip and forearm development
✅ Rotating design reduces friction
✅ OCR and climbing training benefits
❌ Dramatically increases exercise difficulty
❌ Specialized use (not everyday training)
7. Northern Fitness Orion Wall-Mounted Multi-Grip
If you’re ready to go premium, the Northern Fitness Orion represents the Canadian-made excellence our home gyms deserve. This wall-mounted beauty features multiple grip positions, knurled handles for superior traction, and build quality that screams “commercial gym.”
Designed and distributed by a Canadian company, it supports 400 lbs when properly installed into wall studs (professional installation recommended). What sets it apart? The variety of grip angles and positions combined with a finish that holds up to our climate extremes. Whether you’re in humid coastal BC or frozen prairie winters, this attachment performs.
At $180-$240 CAD, it’s the most expensive option on this list, but you’re paying for Canadian customer service, faster shipping (from their Canadian warehouse), and partnership with Canada’s trusted carriers. The multi-grip design targets different muscle groups without switching equipment, and the build quality inspires confidence for weighted pull-ups.
One consideration: wall mounting requires proper installation into studs. It’s not rack-mounted like the others, so factor in installation complexity. But once it’s up, it’s rock-solid for years of training. Northern Fitness backs it with excellent customer support and a 5-star reputation among Canadian home gym owners.
Specs: 400 lb capacity, knurled multi-grip design, wall-mounted, commercial-grade construction
Price: $180-$240 CAD
Availability: Ships from Canadian warehouse via Northern Fitness
✅ Canadian company with local support
✅ Commercial-grade build quality
✅ Multiple grip positions with knurling
❌ Highest price point
❌ Requires wall installation (not rack-mounted)
✨ Don’t Miss These Exclusive Deals!
🔍 Take your back training to the next level with these carefully selected products available in Canada. Click on any highlighted item to check current pricing and availability on Amazon.ca. These tools will help you create authentic upper body strength your training deserves!
What Makes a Pull Up Bar Attachment Power Rack Worth Buying?
Think of your power rack as a canvas and the pull up bar attachment as the brushstroke that completes the masterpiece. But what separates a game-changing addition from a waste of money gathering dust in your garage?
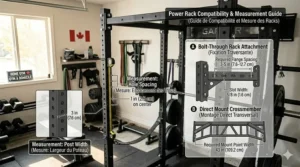
First up: compatibility. Canadian power racks typically feature 2″ x 2″ or 3″ x 3″ uprights with either 1″ or 5/8″ hole spacing. Your attachment must match these specifications perfectly. I’ve seen too many lifters buy “universal” attachments that end up being universally incompatible. Check your rack’s measurements before pulling the trigger on any purchase.
Weight capacity matters more than you might think. Sure, you might only weigh 180 lbs now, but what about when you add a 45 lb weight vest? Or when your training partner who weighs 220 lbs wants to use it? Look for attachments rated at least 400 lbs—it provides a safety margin and indicates quality construction. According to the Canadian Physical Activity Guidelines, strength training activities for major muscle groups should be performed at least 2 days per week, so you need equipment that withstands regular, intense use.
Grip variety transforms a one-dimensional tool into a complete training system. Standard straight bars work fine, but multi grip pull up bar canada options let you target muscles from different angles. Wide grips emphasize lats, narrow grips hit biceps harder, and neutral grips save your shoulders. Power rack chin up bar attachments with multiple positions prevent plateau and keep training interesting across Canadian winters when outdoor workout options disappear.
Material quality separates weekend warriors from serious athletes. Look for 11-gauge steel or thicker (lower numbers mean thicker steel). Powder coating protects against rust in humid basements or unheated garages. The angled pull up bar models often feature 14-gauge or 6-gauge construction—that’s serious metal that won’t flex or wobble under load.
Finally, consider installation ease. Some attachments require drilling, others use hitch pins, and some leverage existing rack holes. Canadian garage temperatures swing from -30°C to +30°C throughout the year—metal expands and contracts. Quality attachments account for this with proper fitting mechanisms that maintain security through temperature fluctuations.
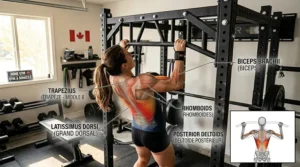
Understanding Different Grip Positions and Their Benefits
Your hands are the interface between your body and the bar, and how you position them determines which muscles do the heavy lifting. Let’s break down the science behind grip variations and why they matter for your back training equipment arsenal.
Pronated (overhand) grip represents the classic pull-up position. Palms face away from you, hands slightly wider than shoulder-width. This position maximally engages your latissimus dorsi—those wide back muscles that create the coveted V-taper. Research shows pronated grips activate the middle trapezius more than neutral grips, making them essential for complete back development.
Supinated (underhand) grip, also called chin-ups, flips your palms toward you. This subtle change shifts emphasis to your biceps while still working the back muscles. Many beginners find chin-ups easier to learn than pull-ups because the biceps provide more assistance. If you’re building toward your first unassisted pull-up, starting with chin-ups makes sense.
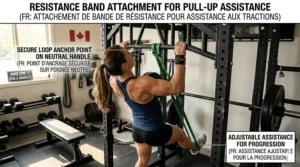
Neutral grip positions your palms facing each other, creating a shoulder-friendly angle that reduces risk of impingement. This is where fat grip pull up attachment options really shine. The neutral position allows natural arm rotation and reduces stress on the rotator cuff. For lifters dealing with shoulder issues or anyone focused on long-term joint health, neutral grips are essential.
Wide grip pull-ups (hands positioned wider than shoulder-width) increase range of motion at the shoulder joint and place maximum tension on the outer lats. These build width in your back. However, studies indicate that grips too wide can increase injury risk and reduce the number of reps you can complete. Finding that sweet spot—about 20-50% wider than shoulder-width—optimizes both safety and effectiveness.
Close grip variations bring your hands closer together, shifting work to the lower lats and involving more bicep activation. These are excellent for building thickness in the middle back and developing arm strength simultaneously.
The beauty of multi grip pull up bar canada options is cycling through these positions throughout your training week. Monday might be wide pronated grips, Wednesday neutral, Friday close supinated. This variation prevents overuse injuries and ensures balanced development. It’s like crop rotation for your muscles—keeps everything healthy and productive.
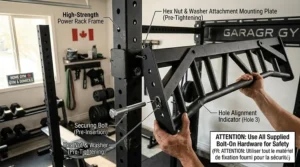
Installation Tips for Canadian Home Gyms
Installing a pull up bar attachment power rack in your Canadian home gym isn’t rocket science, but a few considerations specific to our climate and housing can save you headaches. Here’s what three years of testing various setups across different Canadian provinces taught me.
Temperature considerations: If you’re setting up in an unheated garage (common across the prairies and interior regions), metal expansion and contraction matters. Tighten bolts and pins at moderate temperatures—around 15-20°C if possible. Attachments secured during summer heat will loosen in winter cold and vice versa. Check tightness seasonally, especially after major temperature swings.
Ceiling height challenges: Many Canadian basements feature 7-foot ceilings, barely adequate for pull-ups if you’re tall. Measure from the floor to where your attachment will sit, then add your height plus 4-6 inches for clearance. If numbers are tight, consider invertible attachments like the REP Fitness model or wall-mounted options that provide better floor clearance.
Concrete vs. wood considerations: Mounting to concrete basement walls requires masonry anchors and a hammer drill. Don’t cheap out on anchors—use heavy-duty concrete anchors rated for at least 3x your expected load. Mounting to wood studs is easier but ensure you’re hitting actual studs (16″ or 24″ on centre in most Canadian construction), not just drywall.
Rack compatibility verification: Before installation, physically test the fit. Slide the attachment onto your rack without tightening. Does it wobble? Are the holes perfectly aligned? Small misalignments compound under load. If something doesn’t feel right during dry fitting, it definitely won’t improve when you’re hanging from it.
Safety redundancy: Canadian building codes don’t specifically cover home gym equipment, but safety principles still apply. Use all provided safety pins, ensure j-hooks are properly seated, and never rely on a single point of contact for support. If an attachment uses both pins and bolts, use both—redundancy saves shoulders (and worse).
Space planning: Account for your full movement range. Can you do a full pull-up without hitting ceiling joists? Can you kip without striking walls? Perform slow-motion movements before adding weight to identify clearance issues. This is especially important for bodyweight pull exercise gear that requires dynamic movement.
One final tip: keep basic tools nearby. An adjustable wrench, Allen keys, and WD-40 should live near your rack. Monthly checks of bolt tightness take 2 minutes and prevent issues before they become problems. Think of it like checking your car’s tire pressure—simple maintenance that prevents major headaches.
Power Rack vs. Wall-Mounted: Which Setup Suits Canadians Better?
The debate between power rack attachments and wall-mounted pull-up bars splits the Canadian fitness community like hockey rivalries. Both have passionate supporters, and honestly? The right answer depends entirely on your specific situation.
Power rack attachments offer ultimate flexibility. Move houses? Take the rack and attachment with you. Want to adjust height? Reposition it in different holes. Need the space for something else temporarily? Remove the attachment in minutes. For renters or anyone who values adaptability, rack-mounted solutions win hands down.
The challenge? Your rack becomes the limiting factor. If your power rack tops out at 84″, your pull-up bar sits there too. For lifters over 6’2″, this can mean compromised range of motion or banged heads on overhead beams. Also, rack-mounted bars typically sit inside the rack width, limiting grip width to whatever fits between uprights (usually 42-48″).
Wall-mounted systems provide superior ceiling clearance and often allow wider grip options. The Northern Fitness Orion and similar models extend from the wall, giving you full range of motion regardless of height. For dedicated home gym spaces that won’t change purpose, wall mounting makes sense.
The trade-off? Commitment. Once you drill into studs or concrete, you’re married to that location. Selling your house? You’re either patching walls or hoping the new owners appreciate your fitness dedication. Wall mounting also requires competent installation—one incorrectly placed anchor can be dangerous.
For Canadian homeowners with dedicated gym spaces, wall mounting often provides the best long-term solution. The installation permanence ensures stability, and you’re not limited by rack dimensions. Plus, it frees up your power rack for other attachments like spotter arms or dip bars.
For renters, those planning to move, or anyone wanting maximum flexibility, rack attachments offer better value. You can experiment with different heights and positions without permanent modifications. The slight reduction in grip width and potential ceiling clearance issues are reasonable trade-offs for adaptability.
My recommendation? If you own your home and have a dedicated gym space with 8+ foot ceilings, consider wall mounting. If you rent, plan to move, or share space with other household functions, go rack-mounted. Either way, ensure your lat development tools match your specific situation rather than following generic advice.
Maintaining Your Pull-Up Bar Attachment Through Canadian Seasons
Canadian seasons test equipment in ways our American friends can’t imagine. From -40°C prairie winters to humid Maritime summers, your pull up bar attachment power rack faces serious environmental challenges. Here’s how to keep it functioning flawlessly year-round.
Winter maintenance (November-March): Unheated garages across Canada drop below freezing for months. Metal becomes brittle, lubricants thicken, and condensation creates rust when temperatures fluctuate. Before winter hits, apply a thin coat of 3-IN-ONE oil to moving parts like hitch pins or adjustment mechanisms. Wipe excess to prevent drips on your floor. Check bolt tightness monthly—cold contracts metal, potentially loosening connections.
For powder-coated bars, inspect for chips or scratches. Even tiny damage points let moisture penetrate, causing rust that spreads beneath the coating. Touch up small chips with appliance paint or clear nail polish (yes, really). It’s ugly but effective. If you’re training in sub-zero temperatures, consider wearing thin gloves initially to prevent skin adhering to frozen metal—learned that one the hard way.
Spring thaw (April-May): This is prime rust season. Temperature swings create condensation as metal warms and cools. After winter, thoroughly wipe down all metal surfaces with a dry cloth. Check for rust spots and address them immediately with steel wool and protective coating. Inspect attachment points—freeze-thaw cycles can work bolts loose even if they were tight in November.
Summer humidity (June-August): Coastal regions and humid Ontario summers promote rust on unprotected steel. Keep a chalk bucket near your bar—not just for grip, but chalk absorbs moisture. After workouts in humid conditions, wipe down bars with a dry towel. The sweat-salt combination accelerates corrosion, especially on textured or knurled surfaces where moisture hides in grooves.
Fall preparation (September-October): Before cold returns, perform a full inspection. Tighten all bolts, lubricate moving parts, touch up any coating damage, and verify structural integrity. This is also when I replace any attachment that shows concerning wear. Better to swap out questionable equipment in September than discover problems during a January PR attempt.
General care year-round: Chalk is your friend, but it’s also abrasive. Brush off excess chalk buildup monthly—it traps moisture against metal. For bars in heated spaces, weekly wipe-downs with a barely damp cloth followed by immediate drying prevent buildup. Never use WD-40 directly on gripping surfaces (it makes them slippery), but it’s excellent for pins, bolts, and adjustment mechanisms.
Store any removable attachments (like the Titan neutral grip handles or FitBar fat grips) in a dry location when not in use. Even premium powder coating can’t withstand months of neglect in temperature extremes. A simple plastic storage bin keeps accessories in prime condition between sessions.
Maximizing Your Pull-Up Training: Progressive Approaches
Buying the perfect pull up bar attachment power rack is step one. Actually using it effectively? That’s where transformation happens. Here’s a progressive approach that works for everyone from beginners struggling with their first rep to advanced athletes chasing muscle-ups.
For absolute beginners (can’t do 1 pull-up): Start with dead hangs. Grab your multi grip pull up bar canada attachment and simply hang for time. Begin with 3 sets of 10-30 seconds. This builds grip strength and acclimates your shoulders to supporting bodyweight. Progress to scapular pull-ups—hang, then pull shoulder blades down and together without bending arms. These activate the proper muscles for full pull-ups.
Next, eccentric-only reps. Jump or step to the top position (chin above bar), then lower yourself as slowly as possible. Aim for 5-10 second descents. Do 3-5 reps, rest 2-3 minutes, repeat for 3-5 sets. This builds strength in the specific range of motion you need. Most beginners achieve their first full pull-up within 4-8 weeks using this progression.
For intermediates (can do 3-10 pull-ups): Focus on volume and variety. If you max out at 8 reps, structure training like this: Set 1: 6 reps (75% of max), rest 90 seconds. Set 2: 5 reps, rest 90 seconds. Set 3: 4 reps, rest 90 seconds. Set 4: 3 reps, rest 90 seconds. Set 5: 2 reps. That’s 20 total reps—more than you’d get doing max sets to failure.
Rotate grip positions. Monday: wide pronated grip for lat width. Wednesday: neutral grip for shoulder health. Friday: close supinated grip for biceps and lat thickness. This variation prevents overuse injuries and develops balanced strength. The fat grip pull up attachment can be introduced once weekly to build crushing grip strength.
For advanced lifters (10+ pull-ups): Add external resistance. Weight vests or dip belts let you progressively overload. Start conservative—add 10 lbs and perform sets of 5-6 reps. Gradually increase weight while maintaining perfect form. Alternatively, incorporate advanced variations: archer pull-ups (one arm pulls more), typewriter pull-ups (side-to-side movement at top), or L-sit pull-ups (legs extended forward).
Consider training specific weak points. Struggle at the bottom? Do paused reps with 2-second hold at the bottom. Weak at the top? Perform top-half pull-ups only. Can’t engage lats properly? Try behind-the-neck pull-ups (carefully—not for everyone). The angled pull up bar variations help target muscles from novel angles that standard bars can’t reach.
Programming recommendations: The Canadian 24-Hour Movement Guidelines emphasize regular strength training as part of healthy living. I recommend training pull-ups 2-3 times per week with at least 48 hours between sessions. Your muscles need recovery time to adapt and grow stronger. Monday/Thursday or Monday/Wednesday/Friday work well for most schedules.
Track progress religiously. Note reps, sets, grip type, and any additional weight. Small improvements—adding one rep, increasing weight by 5 lbs, improving form quality—compound over months into dramatic transformation. Pull-ups are humbling exercises that reward consistency and punish ego lifting.
Common Mistakes That Sabotage Your Pull-Up Progress
I’ve watched hundreds of lifters struggle with pull-ups, and honestly? Most obstacles are self-inflicted. These mistakes plague everyone from garage gym beginners to experienced athletes, and fixing them unlocks progress faster than any fancy equipment.
Mistake #1: Kipping before you’ve earned it: CrossFit made kipping pull-ups famous, but they’re advanced technique for athletes who’ve already mastered strict pull-ups. Trying to kip your way to your first pull-up is like learning to run before you can walk. Build strict pulling strength first—at least 8-10 strict pull-ups before adding kip. The power rack chin up bar should facilitate controlled movement, not swinging chaos.
Mistake #2: Neglecting scapular engagement: Most failed pull-ups happen because lifters start by yanking with their arms instead of initiating the pull from their shoulder blades. Before every rep, think “shoulders down and back” to pack your scapulae. This creates a stable platform for your arms to pull from and prevents shoulder impingement. Your bodyweight pull exercise gear works better when you use proper biomechanics.
Mistake #3: Partial reps and ego lifting: Stopping before your chin clears the bar or starting from an incomplete hang might feel like progress, but it’s lying to yourself. Every pull-up should start from a dead hang with fully extended arms and finish with your chin clearly above the bar. Half reps build half strength. If you can only manage 3 full-range reps, that’s infinitely better than 8 partial cheats.
Mistake #4: Training too frequently: Pull-ups are demanding compound movements that tax your entire upper body. Training them daily sounds hardcore but usually leads to overuse injuries, especially in the elbows and shoulders. Give your body 48-72 hours between pull-up sessions. Your back training equipment doesn’t help if you’re too injured to use it.
Mistake #5: Ignoring antagonist muscles: Pull-ups work pulling muscles exclusively. Without balancing push work (push-ups, dips, overhead press), you develop muscular imbalances that
affect posture and increase injury risk. For every pull-up session, schedule a pushing session. Balance is everything.
Mistake #6: Wrong grip for goals: Using only one grip position is like eating only chicken for protein—it works but you’re missing variety. If you want overall back development, rotate through wide, narrow, neutral, and underhand grips. Stuck in a plateau? Change your grip. The multi grip pull up bar canada options exist specifically to address this mistake.
Mistake #7: Poor breathing: Many lifters hold their breath during pull-ups, creating unnecessary intrathoracic pressure and limiting rep potential. Exhale during the pull-up (the hard part), inhale on the descent. Proper breathing improves endurance and prevents lightheadedness on high-rep sets.
Mistake #8: Skipping warm-up: Cold muscles and connective tissue don’t perform well. Spend 5 minutes with arm circles, band pull-aparts, and light dead hangs before your first working set. This is especially crucial in Canadian winter garages where cold metal and cold muscles are a recipe for strain.
Fixing these mistakes doesn’t require new equipment or radical changes—just honest self-assessment and commitment to proper technique. Your lat development tools work better when you use them correctly. Quality always trumps quantity in pull-up training.
Budget vs. Premium: What Actually Matters?
The pull-up bar attachment market spans from $45 budget options to $240+ premium systems. Where should your hard-earned Canadian dollars go? Having tested everything from bargain-basement to top-shelf, I can tell you the answer isn’t as simple as “buy the most expensive.”
What you’re paying for in budget options ($45-$80 CAD): Basic functionality. The Sunny Health SF-XFA001 and CAP Barbell straight bars prove you can get solid, safe equipment without premium pricing. These attachments use 11-12 gauge steel, standard powder coating, and straightforward mounting systems. They’ll handle your bodyweight plus reasonable additional load (weight vest up to 40-50 lbs) for years of regular use.
What you’re NOT getting: grip variety, premium finishes, extensive warranties, or customer service excellence. Budget options work fine if you’re doing standard pull-ups and chin-ups without advanced variations. For beginners building toward their first pull-up or intermediates maintaining basic strength, these represent exceptional value.
Mid-range sweet spot ($100-$160 CAD): This is where you find the best value-to-performance ratio. The Bells of Steel Adjustable and similar options offer upgraded materials (6-8 gauge steel), better engineering (hitch pin systems, adjustability), and features like height customization or additional grip positions. The quality jump from budget to mid-range is more noticeable than mid-range to premium.
For serious home gym enthusiasts planning to use their equipment 3-4 times weekly for years, mid-range delivers the durability and features that justify the cost. You get commercial gym quality at home gym prices.
Premium territory ($180-$240+ CAD): Here you’re paying for ultimate durability, Canadian customer service (in cases like Northern Fitness), extensive grip variations, and finishes that withstand abuse. The REP Fitness Multi-Grip and Northern Fitness Orion represent this category—built to commercial gym standards where equipment faces daily punishment from dozens of users.
Premium makes sense if you train very frequently (5+ days weekly), use heavy additional weight (60+ lb weight vests), or have specific needs like extensive grip variation or exceptional build quality. Also consider premium if this is a forever gym—you plan to use this equipment for a decade or more.
What doesn’t matter: Price doesn’t always correlate with features you actually need. A $200 bar doesn’t make you stronger than an $80 bar—effort makes you stronger. Don’t buy premium if you’re training 2x weekly with bodyweight only. Conversely, don’t cheap out if you’re serious about progressive overload and varied training.
The smart approach: Match your investment to your commitment level. Just starting? Buy budget and upgrade later if you stick with it. Training consistently for months already? Mid-range offers the best long-term value. Advanced athlete with specific goals? Premium delivers features that matter.
Canadian pricing often includes duties and shipping, so compare total landed costs, not just sticker prices. An $80 US bar becomes $110+ CAD after conversion, duties, and shipping. Buying from Canadian retailers or companies shipping to Canada (like the options listed here) often costs less than importing yourself.
Frequently Asked Questions
❓ How do I know if a pull up bar attachment will fit my power rack?
❓ What's the best grip width for building a wide back in Canada?
❓ Can I install a pull up bar attachment in an unheated Canadian garage?
❓ How much weight can I safely add for weighted pull-ups in 2026?
❓ What's the difference between a power rack chin up bar and a standard pull-up bar?
Conclusion: Choosing Your Perfect Pull-Up Solution
After testing dozens of options across Canadian winters and summers, here’s what I know for certain: the best pull up bar attachment power rack is the one you’ll actually use consistently. Fancy features don’t matter if the attachment sits gathering dust because it’s incompatible with your rack or uncomfortable for your training style.
For most Canadian home gym owners, I recommend starting with a mid-range option like the Bells of Steel Adjustable ($120-$150 CAD) or the REP Fitness Multi-Grip if budget allows ($160-$200 CAD). These provide the durability, versatility, and quality that justify the investment while avoiding premium prices you might not need yet.
If you’re budget-conscious or just starting out, the Sunny Health SF-XFA001 ($50-$65 CAD) offers legitimate quality at an accessible price point. Don’t let anyone tell you expensive equipment is required for results—consistent effort on basic equipment beats inconsistent use of premium gear every time.
Advanced athletes with specific needs—shoulder issues requiring neutral grips, grip strength goals demanding fat bars, or space constraints needing wall-mounted solutions—should target specialized equipment that addresses those exact needs. The Northern Fitness Orion or Titan Fitness Neutral Grip handles serve specific purposes brilliantly.
Remember that according to research and Canadian health guidelines, the real magic happens when you pair quality equipment with consistent training. Your back training equipment only delivers results when you actually pull yourself up 2-3 times weekly, progressively adding reps, weight, or difficulty over months and years.
Canadian winters test both equipment and willpower. Choose attachments built to withstand our climate, maintain them properly, and commit to showing up even when it’s -25°C outside and your garage gym feels like a freezer. That’s when real strength—mental and physical—develops.
The pull up bar attachment power rack you choose today can serve you for a decade or more if you invest wisely. Match your equipment to your actual needs, not your aspirational self. Buy for the training you do, not the training you imagine doing.
Now stop researching and start pulling. Your stronger back is waiting on the other side of consistent effort. The bodyweight pull exercise gear is just the tool—you’re the engine that drives results.
Recommended for You
- 7 Best Landmine Attachment for Power Rack Canada 2026
- 7 Best Dip Attachments for Power Rack Canada 2026
- 7 Best Safety Spotter Arms in Canada 2026
✨ Found this helpful? Share it with your friends! 💬🤗